How to Write and Print Checks in QuickBooks Online


Many or all of the products featured here are from our partners who compensate us. This influences which products we write about and where and how the product appears on a page. However, this does not influence our evaluations. Our opinions are our own. Here is a list of our partners and here's how we make money.
In today's world of small-business accounting, it's common to pay most of your bills online or with a credit card. Sometimes however, you still need to print a good old-fashioned check. If you use one of QuickBooks' small-business products, like QuickBooks Online, here's how to get it done.
FEATURED
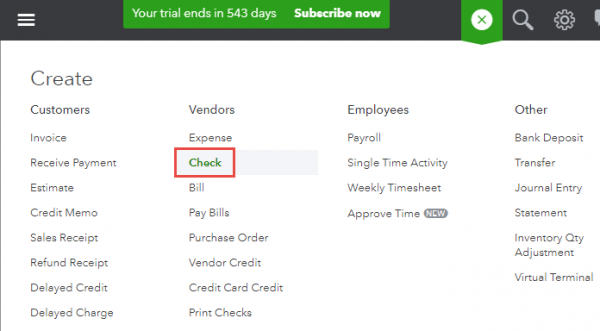
Step 1: Create a check in QuickBooks Online
Here is what the check form looks like in QuickBooks Online. From the homepage, click the “Quick Create” icon (the + sign), select “Vendors,” and then “Check”:
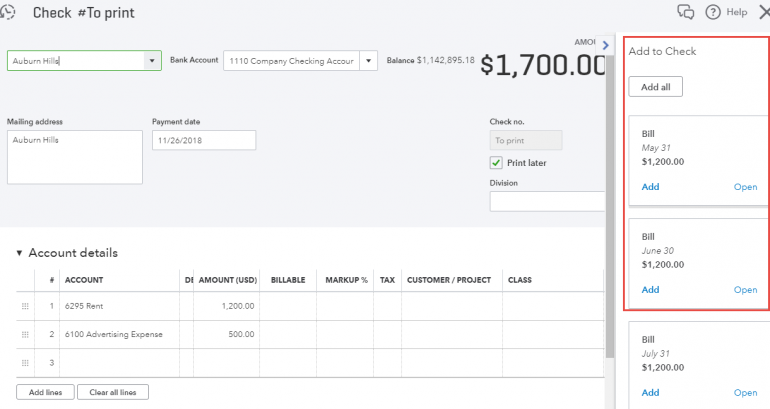
If you take a look at the image below, there are several important notes to consider: In QuickBooks Online Plus, you can have the “Items” tab on the check, so you can buy items to resell. That is a nice touch. QuickBooks Online Plus supports this; they’re called two-sided items and pass through time or material expenses so that a user can create invoices for them. You will also notice “Location” and “Class fields,” also a “Plus” feature. (Check out this video on class/location tracking if you want to learn more.)
The check below is crediting the company checking account and then debiting the “Rent” and “Advertising” accounts. So it is a “split” transaction. And instead of the check number field, the check will be printed later on, which we’ll cover in a few minutes. There's also an option to tag the account amounts to a customer/sub-customer/project for profitability tracking (see a video on that) and/or mark the “Billable” checkbox to pass through (see a video on that) the expenses to a customer/project.
If you save the check, then click on the “More” tab/”Transaction Journal,” here is what this check has done to the general ledger, all just by clicking Save & Close:

It is important to not create a check when there is already a bill, as this will duplicate the expense. You will want to look at the “Drawer” transactions that will open up to alert you as soon as you tab from the “Payee/Vendor” field on the check. Note in the picture below, if you already have entered a bill for the same expense, you need to go “Pay the Bill,” not “Create a Check.” “Pay Bills” can be found by clicking the “+” sign.
Overbooking expense or COGS is something your accountant or bookkeeper might have to clean up, and creating a check while a bill exists instead of making a bill payment is the main culprit. Just worth considering and watching out for.
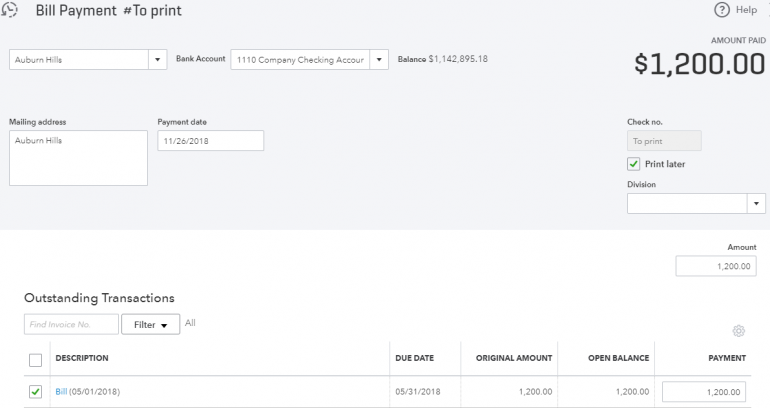
Now, the good news is that when you click on the “Add” link in the drawer, the bill is added to the check which converts to a “Bill Payment Check,” which is the correct way to pay down your payables.
Step 2. QuickBooks check printing
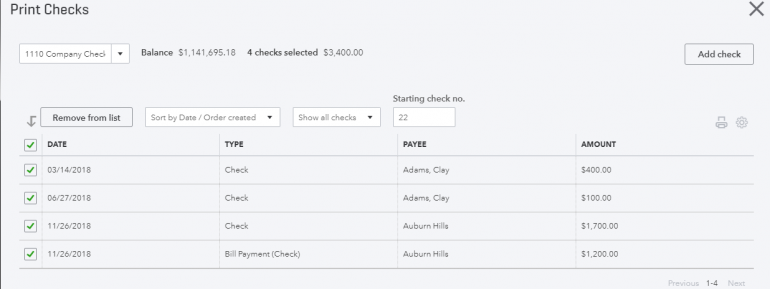
You can print both regular checks and bill payment checks the same way: “Quick Create” > “Vendors” > “Print Check” — see the image below for an example.
Let’s walk through printing out the Auburn Hills rent check dated 11/26 for $1,700. First, you will want to click the “Print” setup tab along the bottom of the “Print Checks” window. You can only align the amount; there are no other check print alignment options.
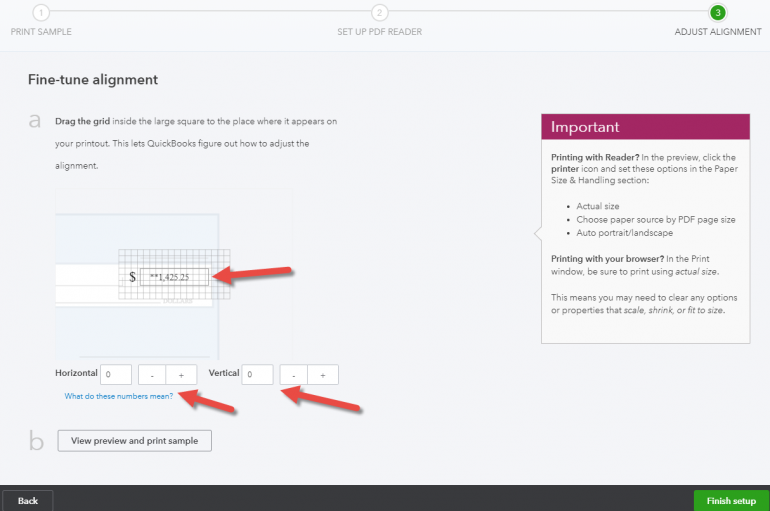
Before you print checks for the first time, make sure you do this alignment wizard. This will ensure that your printed amount lines up properly on your pre-printed check stock. (Note: If you want blank check stock, you’ll need an app for that, like one of these.) Below is what that wizard looks like.

Click on “No,” continue setup to get to the amount alignment field. If you know the actual horizontal and vertical, you can enter them or hit the “+/-” keys. You could also just grab the dollar amount using your mouse and drag it into position. Then click “View preview and print sample” and keep trying until you get it aligned how you like. Then click “Finish Setup.” Voucher and standard check stock are both supported.
Click on “Preview” and print tab, and do your thing!
Once you print, you’ll be asked:
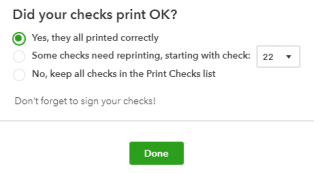
Don’t say yes until the check(s) are completely printed. As luck would have it, the minute you say yes and anything isn’t finished, that’s going to be when your printer decides to eat 10 checks. To reprint them, you’ll have to open each one that didn’t print individually and mark it to be printed and do it all over. No one wants that!
QuickBooks check printing: Buying checks
Of course, to perform QuickBooks check printing, you’ll need QuickBooks checks. There are three main types of checks QuickBooks sells on its website. Let’s review them to see which is the best option for your business.
Basic Voucher Check: These checks are designed for payroll and accounts payable. You can give one stub to your employee or vendor and keep the other for your files. Prices start at $36.99 for a bundle of 50 checks.
Secure Plus Voucher Checks: These checks come with advanced security features, including a heat-sensitive icon that prevents photocopying, a custom watermark that protects against forgery and counterfeiting, and security coating that blocks tampering with your check info. A bundle of 50 costs $66.99.
Secure Premier Voucher Checks: QuickBooks claims these checks are the most secure checks on the market. They come with even more security features, including a security hologram that makes your check virtually impossible to counterfeit. Prices start at $72.99 for a bundle of 50.
QuickBooks offers additional checks for a variety of different business purposes. See the full list of checks.
QuickBooks Online resources
Read more about how QuickBooks Online works.
A version of this article was first published on Fundera, a subsidiary of NerdWallet.
On a similar note...
| Product | Starting at | Promotion | Learn more |
|---|---|---|---|
 QuickBooks Online NerdWallet Rating Learn more on QuickBooks' website | $30/month Additional pricing tiers (per month): $60, $90, $200. | 50% off for first three months or free 30-day trial. | Learn more on QuickBooks' website |
 Xero NerdWallet Rating Learn more on Xero's website | $15/month Additional pricing tiers (per month): $42, $78. | 30-day free trial or monthly discount (terms vary). | Learn more on Xero's website |
 Zoho Books NerdWallet Rating Learn more on Zoho Books' website | $0 Additional pricing tiers (per month): $20, $50, $70, $150, $275. | 14-day free trial of the Premium plan. | Learn more on Zoho Books' website |
 FreshBooks NerdWallet Rating Learn more on FreshBooks' website | $19/month Additional pricing tiers (per month): $33, $60, custom. | 30-day free trial or monthly discount (terms vary). | Learn more on FreshBooks' website |
