How to Record a Journal Entry in QuickBooks Online

How to Make a QuickBooks Journal Entry in 5 Steps
- Navigate to the journal entry feature in QuickBooks Online.
- Fill in the date and journal number.
- Enter the correct accounts in the “Category” column.
- Enter the debit and credit amounts until the entry is balanced.
- Add a description and save.
Managing your business’s accounting can be complicated—even with the assistance of accounting software like QuickBooks. This being said, even if you outsource your bookkeeping or accounting, it’s often helpful to understand how some basic features work. If you’re using QuickBooks Online, you may be unclear on how to make a journal entry. A journal entry, as a reminder, is a transaction that’s entered directly to your business’s general ledger. So—how do you make a QuickBooks journal entry?
We’re here to break it down. We’ll show you the five simple steps you can follow to record a journal entry in QuickBooks Online and get a leg up on managing your accounting processes.
What Is a QuickBooks Journal Entry?
First, let’s clarify exactly what a QuickBooks journal entry is. Generally, QuickBooks will automatically record transactions as they occur—you’ll record an invoice, sales receipt, bill, check, etc.—and QuickBooks will pull this data into the general ledger.
However, if you ever need to enter a transaction manually, like to correct an error, for example, you’ll want to use the journal entry feature within QuickBooks Online. When you post a journal entry in QuickBooks, or in any other accounting software, it must balance—any debit you make must have a corresponding credit and vice versa.
For example, as you’ll see below, if you’re recording a journal entry for a check you wrote for a year’s worth of insurance, you’ll need to list a debit to the insurance account and a credit to the checking account.
How to Record a QuickBooks Journal Entry
With the basics in mind, let’s break down exactly how to record a journal entry in QuickBooks.
As we mentioned, we’ll be using “prepaid insurance” in this example.
Step 1: Navigate to the journal entry feature.
The first step is simple—you’ll need to navigate to the section of your QuickBooks Online software that allows you to post journal entries. If you click the + icon at the top right of your file, you’ll see a dropdown menu called “Create” that lists “Journal Entry” in the farthest column on the right-hand side.
Once you’ve clicked “Journal Entry” you’ll navigate to the entry itself to fill in the necessary information.

Step 2: Fill in the date and journal number.
As you can see below, the journal entry form in QuickBooks Online is fairly simple. Once you’ve brought up this form, you’ll want to first edit the journal date. QuickBooks will automatically pull in the current date, so if you’re recording a journal entry from a previous month or day, you’ll want to be sure to enter the correct date.
Next, you’ll want to fill in the journal number. In this example, the journal number is 151—QuickBooks will automatically number any new journal entries sequentially following this number (in other words, the next one would be 152).
Step 3: Enter the correct accounts in the “Category” column.
In this example, we’re creating a journal entry for prepaid rental insurance. Because rental insurance is often prepaid for a month or a year, it’s considered an “other current asset” to start, but needs to be expensed out as the year goes on, monthly. This being said, you could book the prepaid asset using a check, but you can use a general journal entry as well.
With this in mind, we’ll be adding two accounts in the category column. The first account, from your chart of accounts, is the “Company Checking Account.” This is the account that will be losing the money when you pay for your rental insurance. The second account, on the other hand, is the “Prepaid Insurance Account.” This is the account that will be gaining the money you’re using to prepay for your insurance for the year. In any QuickBooks journal entry, there will always be two accounts, one to credit and one to debit.

Step 4: Enter the debit and credit amounts.
Once you’ve pulled the correct accounts, you’ll fill in the corresponding debits and credits. As you can see, rental insurance costs $1,200—so you would add a credit to the checking account and a debit to the prepaid insurance account.
By the nature of a journal entry, you’re impacting your books, in other words, the general ledger. However, it’s also important that a journal entry is always balanced. The debit column has to balance the credit column, no matter how many lines the entry is. Therefore, if you were listing multiple payments within this one entry, you would have to ensure that the debits and credits were equal at the end of the entry.
Step 5: Add a description and save.
The final step needed to complete your QuickBooks journal entry is to add a description. As you can see in our example above, the description explains that this journal entry is prepaying for rental insurance. After you’ve filled in the description, you’ll save the journal entry and close it.
Ultimately, it’s fairly simple to record a journal entry in QuickBooks Online. This being said, a QuickBooks journal entry is perhaps the clearest example of double-entry accounting—when something is debited, something else is always credited. In this way, every transaction within QuickBooks can be thought of like a journal entry.
A customer invoice, for example, debits accounts receivable and credits revenue. A vendor bill, on the other hand, credits accounts payable and debits the cost of goods sold or expenses. In this way, no matter what transaction you enter into QuickBooks Online a journal entry is going on behind the scenes.
How Transactions Post in QuickBooks Online
As we mentioned above, QuickBooks typically pulls the data necessary to add a transaction to the general ledger automatically. When this occurs, a journal entry is essentially happening behind the scenes. Let’s take a look at how that works:
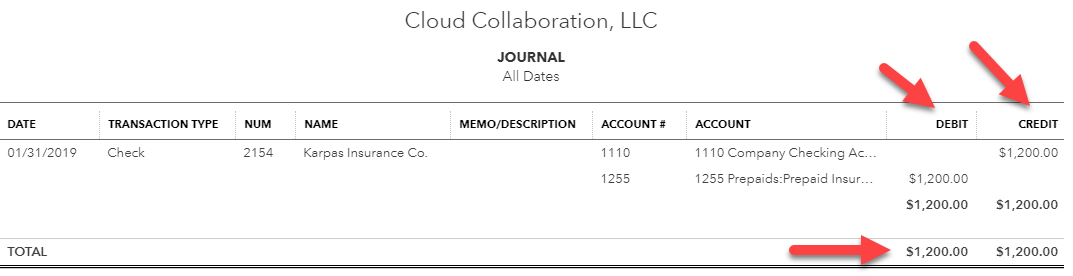
If, for example, we had paid for the rental insurance using a check, you would enter that check as such:

To see the process that occurs when you enter this check into QuickBooks, you can click the “More” tab at the bottom and then “Transaction Journal.”

When you click the transaction journal, you can see the automatic “journal entry” that’s happening behind the check. As you’ll see below, the Check adds a credit of $1,200 to the checking account and a debit of $1,200 to the prepaid insurance account—just as we completed in our example above.
How to Create a Recurring Journal Entry in QuickBooks Online
So, in our example above, we credited the business checking account and debited the prepaid insurance account, however, because we prepaid for a year of insurance, you may be wondering how to actually expense out this cost, monthly, as the year goes on.
To do this, we would create another journal entry. In this case, we’d fill in the same information, but instead of crediting the checking account, we’ll credit the prepaid insurance account and debit the actual insurance expense account.

As you can see, for the month of January, this journal entry just took $100 (1/12 of the total payment) from the prepaid insurance asset account and moved it to the actual insurance expense account—meaning it was moved from the Balance Sheet to the Profit and Loss. You would perform this journal entry every month and can automate the process by making it “recurring.”
To do this, you’ll simply click the “make recurring” text at the bottom of the journal entry. Now this same journal entry will repeat every month through the end of the year.

This being said, you can also start from the Recurring Transactions list under the Gear Icon at the upper-right corner of the QuickBooks Online file, and create this repetitive journal entry this way as well.

In this case, you would click “Recurring Transactions” and then “Select New” and finally, choose “Journal Entry” from the Transaction Type drop-down menu:

As shown below, this will pull up a “Recurring Journal Entry” form where you’ll be able to fill in the same information as we illustrated in the example above. You’ll credit the prepaid insurance account and debit the insurance expense account and indicate that this entry should recur monthly. You can also choose a start date and an end date.

Creating a QuickBooks Journal Entry Report
Now that we’ve explained how to record a QuickBooks journal entry—using our prepaid insurance example—it’s worth mentioning that you can also create a report within QuickBooks Online to keep track of your journal entries.
This report is an Accountant report, called “Journal.”

You can open the journal report under “Reports” and click customize to run the report exclusively for journal entries. You’ll choose “Journal Entry” under “Transaction Type” and then you’ll be able to run the report.

As you can see below, the Journal report feature has pulled a report showing all of your journal entries. You can save this report within your system (with the customizations you made to the transaction type) to easily run it as frequently as you need to.

The Bottom Line
At the end of the day, once you’ve seen it step-by-step, it’s fairly easy to make and record a QuickBooks journal entry. Although QuickBooks typically will perform this function behind the scenes, it’s important to know how to do it yourself, in case you need to edit a mistake or even just manually enter a transaction.
This being said, if you ever face issues with posting transactions or managing your books within QuickBooks, you may find it helpful to reach out to a certified QuickBooks ProAdvisor who should be able to answer any questions you have.

Stacy Kildal
Stacy Kildal is a contributing writer for Fundera.
Stacy Kildal is owner/operator of Kildal Services LLC—an accounting and technology consulting company that specializes in all things QuickBooks. From 2012 to 2017, Stacy has been named one of CPA Practice Advisor’s Most Powerful Women In Accounting.
Stacy is one of the three hosts for the QB Show and has also been featured frequently on Intuit’s Accountant Blog, Community “Ask the Expert” forums, at various Intuit Academy To Go podcasts, as well as hosting a number of Intuit Small Business Online Town Hall sessions.
She is a big fan of working mobile and has been recognized by Intuit as being an expert on QuickBooks Online, having written Intuit’s original courses for the U.S., Singapore and Canadian versions.
Featured
QuickBooks Online
Smarter features made for your business. Buy today and save 50% off for the first 3 months.