How to Run a QuickBooks Sales Tax Report


Many or all of the products featured here are from our partners who compensate us. This influences which products we write about and where and how the product appears on a page. However, this does not influence our evaluations. Our opinions are our own. Here is a list of our partners and here's how we make money.
Sales tax management is a no-profit activity for your business. It’s not fun, but it is necessary. Setting up proper sales tax management systems — both for tracking and for making sure the cash is always available to pay your sales taxes — will give you peace of mind and let you focus on running your profitable business.
This guide is a step-by-step walkthrough of how to run a sales tax report in QuickBooks' small-business software — let's start with the basics.
FEATURED
Sales tax breakdown
Many business owners are confused about sales taxes. Unlike income taxes (taxes on the profits in your business or on your personal income), the money you collect for sales tax is never your business’s income. When you collect sales tax from your customers, you are acting as an agent for the state government.
There is no legal way to reduce your sales tax liability. True, most states that assess a sales tax offer exemptions, but those exemptions — with very few exceptions — apply to the purchaser, not the seller.
Let’s say your state assesses a 5% sales tax on purchases, and you sell a product for $10. The customer will pay you $10.50 ($10 for the product, and 50 cents for the sales taxes). Although the entire $10.50 will go into your business’s bank account, the accounting shows what’s really happening with this money:
Debit: Checking $10.50.
Credit: Sales $10.00.
Credit: Sales Tax Liability 50 cents.
This transaction shows your Checking account increasing by the entire $10.50 your customer paid you. But Sales — your business’s revenue — only increases by $10.00. The Sales Tax Liability account increases by 50 cents. (Remember: Income and Liability accounts are increased by credits. Assets — like Checking — are increased by debits.)
When you run your profit and loss statement, you will only see $10.00 in income for this sale. The 50 cents for sales tax will appear on the balance sheet as a liability — an amount your business owes.
Importance of sales tax remittance
To be clear, not remitting the sales taxes you collect is theft. Your customers pay you the full amount for their purchases — including sales taxes — in good faith, expecting you to report and remit the sales tax portion as required. Sales taxes support numerous public benefits, and when businesses don’t report and remit them correctly, the sales tax rate increases for everyone in the community.
Sales tax authorities take proper sales tax collection, remittance and reporting seriously. Failure to follow the law on sales taxes can result in a series of penalties, ranging from monetary to the revocation of your business license and your business’s closure or, in some cases, even personal incarceration.
How to run a QuickBooks sales tax report
Running a sales tax report in QuickBooks is different in QuickBooks Desktop and QuickBooks Online. We’ll start with the Desktop version of QuickBooks. Keep in mind that the user interface changes slightly with each version of QuickBooks Desktop, so your screens might look slightly different than the following screenshots.
QuickBooks Desktop
1. Make sure sales taxes are enabled for your QuickBooks file.
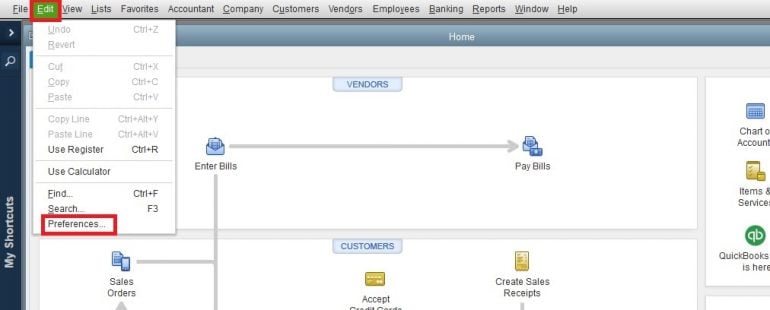
If you didn’t do this during your company file setup, click on Edit, then Preferences.
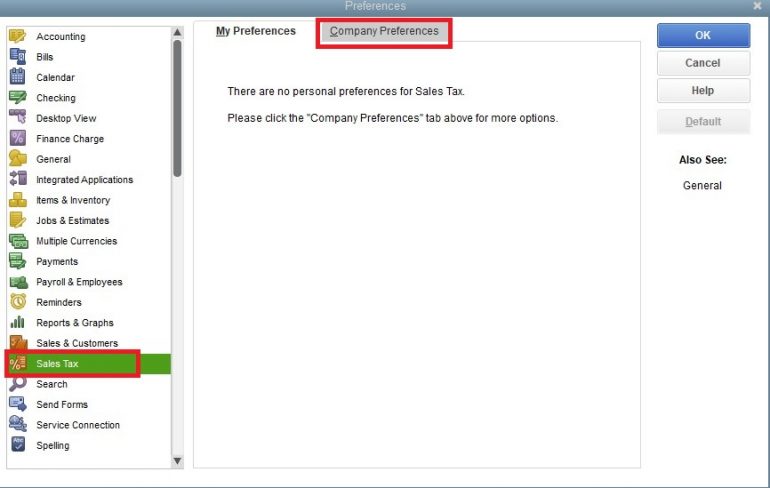
In the pop-up window, select Sales Tax from the left-hand menu, then click the Company Preferences tab at the top of the window.
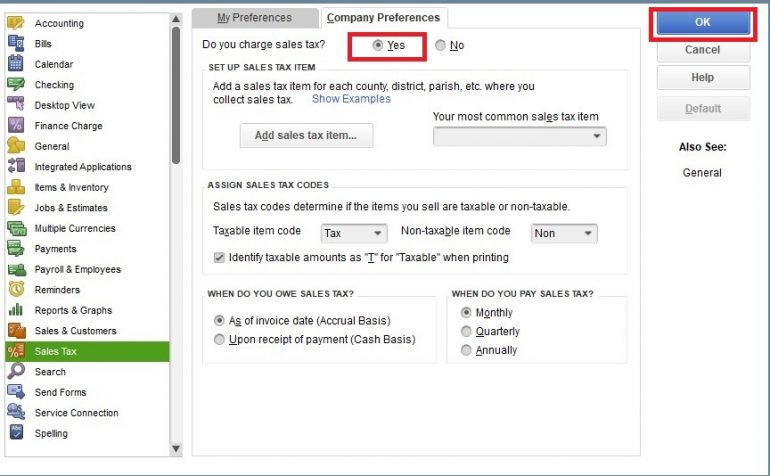
Select the “Yes” radio button, and then follow the prompts on the rest of the pop-up window to set up your sales tax tracking. This is a multi-step process. Due to the number of variations between states and industries, we won’t go into detail here; consult with your accountant or your state’s sales tax authority for assistance with setting up sales tax tracking for your company.
When you have completed this setup, click the “OK” button to save your changes.
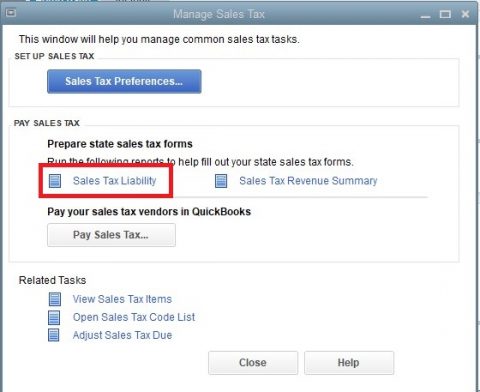
2. At the end of the sales tax period, click the Manage Sales Tax icon on the home screen.
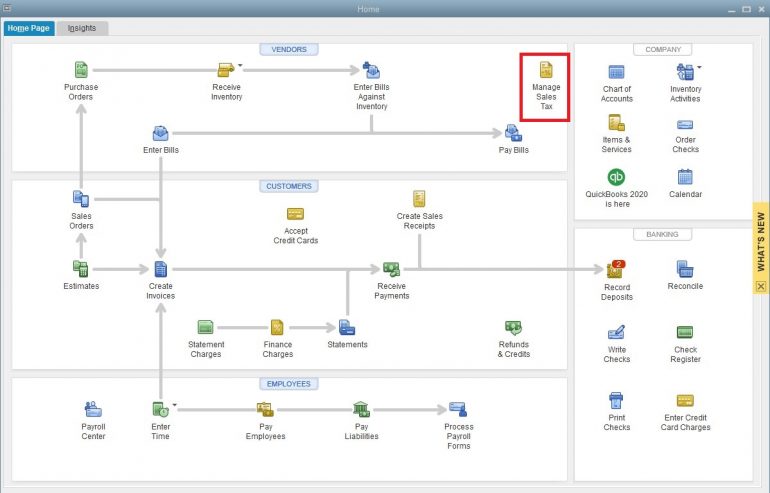
In the pop-up window, choose the sales tax report that will give you the information you need to complete your reporting with the state tax authority. For most businesses, this will be the Sales Tax Liability report.
3. Pay your sales taxes.
After you’ve filed your sales tax return — either by completing a paper form or an electronic form on the state tax authority’s website — you will need to pay your sales taxes. To properly record the payment in QuickBooks and keep your liability account accurate, click the “Pay Sales Tax” button.
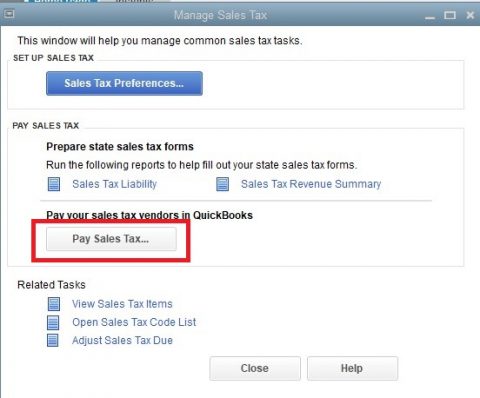
Note this does not actually send the payment to the sales tax authority. This step will allow you to process a check to send to the sales tax authority or to record a payment made electronically on the tax authority’s website.
QuickBooks Online
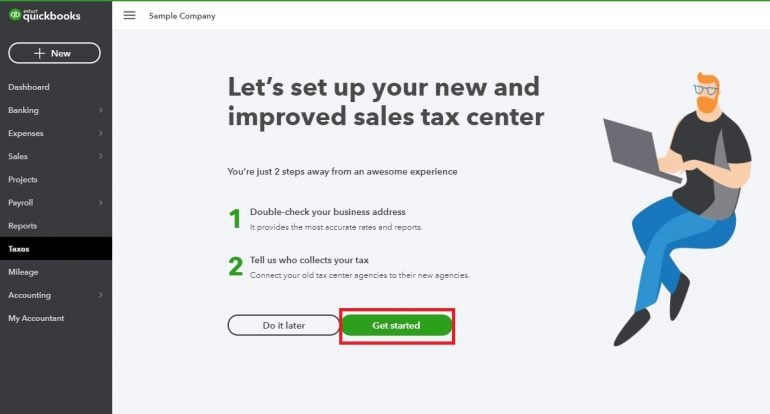
1. Enable your sales tax center in QuickBooks Online.
From the left-hand menu, select Taxes.

Click the “Get Started” button on the setup screen.
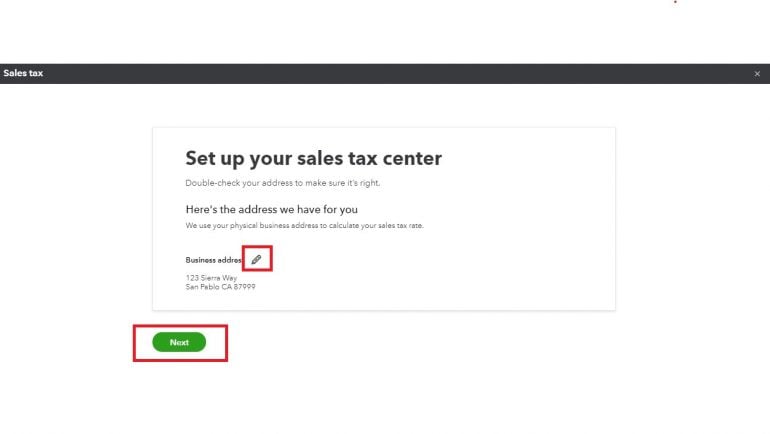
Edit your business’s address if necessary by clicking on the pencil icon. Click the “Next” button when you’re done.
Now, match your sales tax rates to the correct agency or agencies. Click the “Next” button when done.
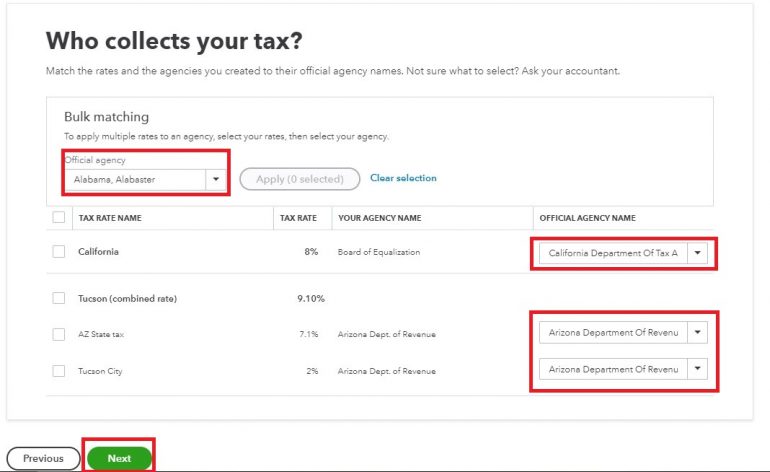
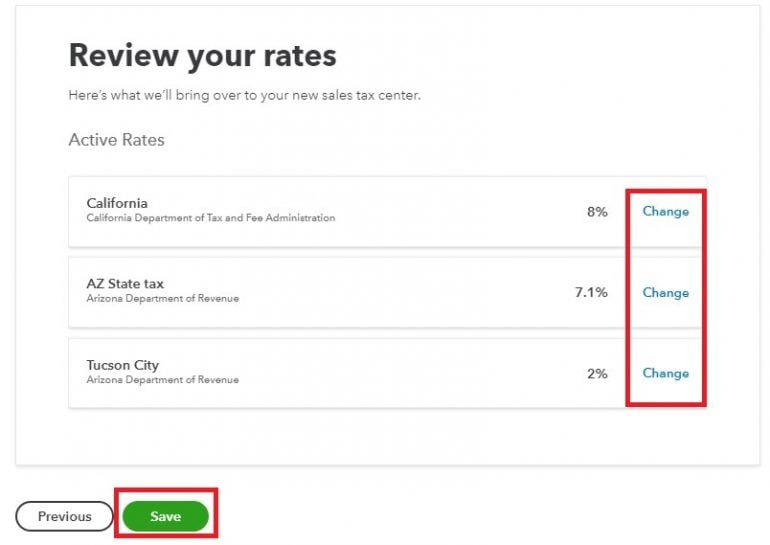
Review the rates, and click “Save” when you’ve verified everything is accurate. If you need to change anything, click the “Change” link next to the rate you need to adjust.
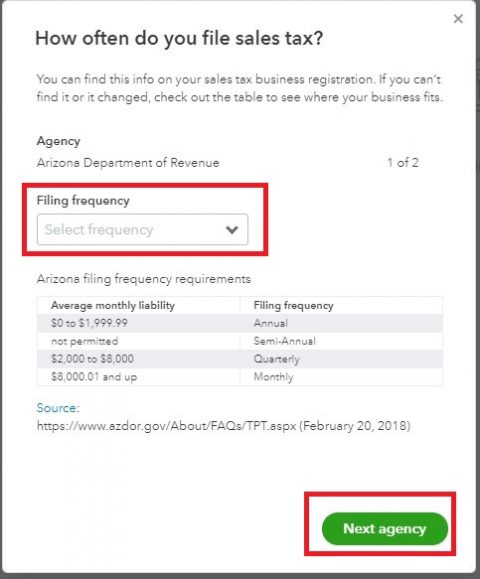
Click through the next two screens, which introduce you to the Sales Tax Center. You will now be taken through the setup for each applicable sales tax agency. This is a multi-step process. Due to the number of variations between states and industries, we won’t go into detail here; consult with your accountant or your state’s sales tax authority for assistance with setting up sales tax tracking for your company.
After you select your Filing Frequency, click on the “Next Agency” button (if you must file with multiple agencies) or the “Save” button (if you must only file with one, or once you have completed the setup for all sales tax authorities).
2. Look at your sales tax due.
Now when you select Taxes from the left-hand menu, you will be taken to your Sales Tax Center. The dashboard will show you your sales tax liability due.
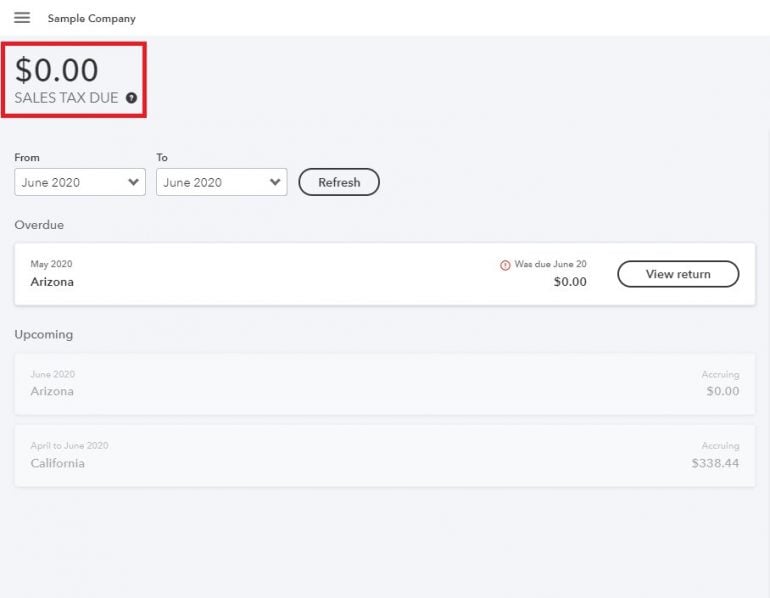
You can view your most recent return by clicking the “View Return” button. If you want to review an earlier period, change the “From” and “To” fields, then click Refresh.
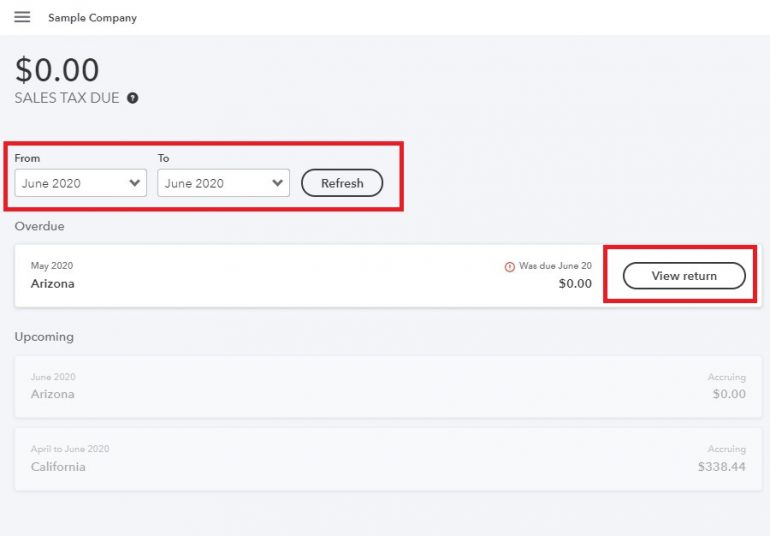
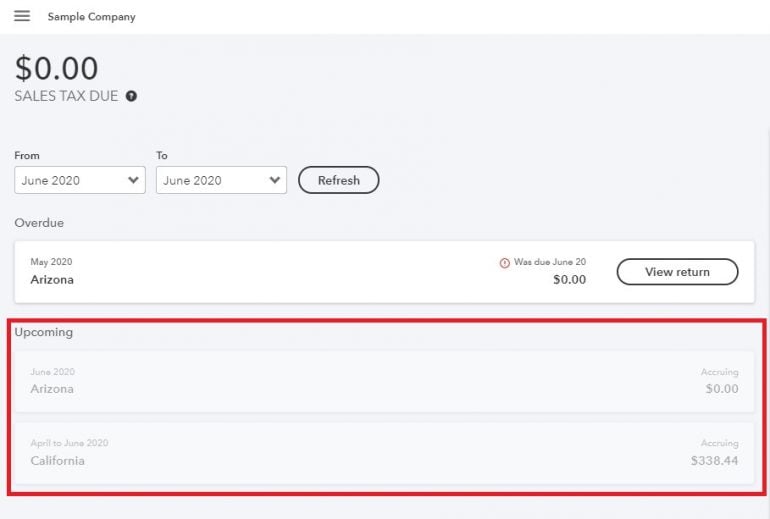
The Upcoming section of the dashboard shows you the amount of sales tax you are accruing (accumulating), but do not yet owe.
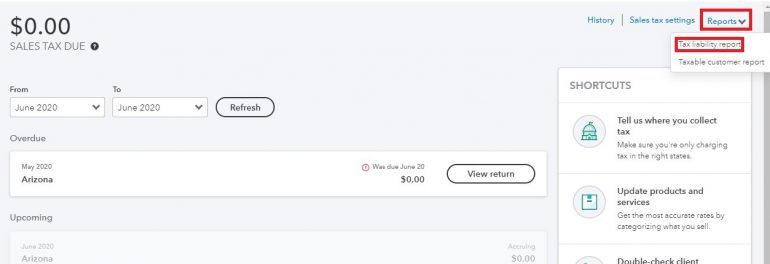
3. View your Sales tax Liability report by clicking on Reports, then selecting Tax Liability Report.
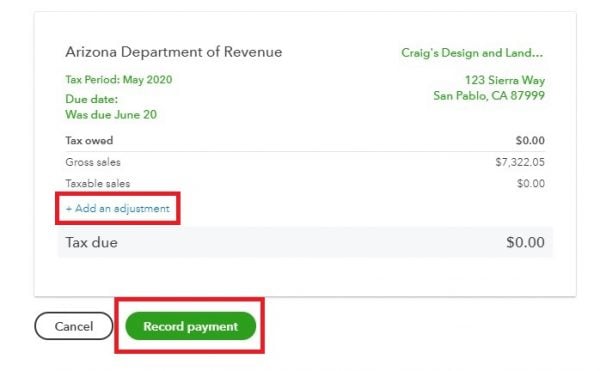
4. When you are ready to pay your taxes, click the “View Return” button.
The following pop-up window will appear; click the “Record Payment” button to properly record the payment and keep your liabilities accurate.
If you need to make an adjustment to your payment, click the “Add an Adjustment” link prior to recording your payment.
Automating sales taxes
If your sales tax requirements are relatively simple — meaning you only need to report and remit taxes for one or two states — you can easily use QuickBooks to help you manage your sales tax reporting and remittance. However, if you have nexus — or sales tax liability — in a number of states, you’ll likely want to automate this process.
Automating sales taxes can save you countless hours and help you prevent potentially costly errors. Some services will also help you set up the required sales tax accounts with the states in which you have nexus.
If you’re interested in automating your sales tax tracking, reporting and payments, check out Avalara or TaxJar. Both services have a number of service options, ranging from tracking only to full automation. They also offer extensive education to help you stay informed about changes that affect your reporting requirements.
Why to keep sales tax separate
One of the most common challenges business owners face is accidentally spending the sales tax they have collected on operating expenses. If you make spending decisions based on your bank account balance — and most business owners do — chances are you have either done this or eventually will.
For example, let’s say it’s the 10th of the month, and you have some vendor bills you need to pay. You check your bank account balance, and you notice you have $15,000 — more than enough to pay your vendor bills and even have a little money left over.
However, you’ve forgotten about sales taxes, which are due on the 15th. When your accountant reminds you on the 13th to make your payment, you panic. You spent most of your available cash paying your bills, and now you don’t have the $7,000 due to your state tax authority.
There’s a simple way to avoid this: Set up a separate bank account for your sales taxes. Once a week, run a QuickBooks sales tax report and transfer the accruing funds for the week into this separate account.
This simple step will prevent you from getting into a pickle when your sales tax payment is due. It will also alleviate the stress of wondering whether you really have as much money to spend as your bank account balance indicates.
QuickBooks Online resources
Read more about how QuickBooks Online works.
A version of this article first appeared on Fundera, a subsidiary of NerdWallet.
On a similar note...

| Product | Starting at | Promotion | Learn more |
|---|---|---|---|
 QuickBooks Online NerdWallet Rating Learn more on QuickBooks' website | $30/month Additional pricing tiers (per month): $60, $90, $200. | 50% off for first three months or free 30-day trial. | Learn more on QuickBooks' website |
 Xero NerdWallet Rating Learn more on Xero's website | $15/month Additional pricing tiers (per month): $42, $78. | 30-day free trial or monthly discount (terms vary). | Learn more on Xero's website |
 Zoho Books NerdWallet Rating Learn more on Zoho Books' website | $0 Additional pricing tiers (per month): $20, $50, $70, $150, $275. | 14-day free trial of the Premium plan. | Learn more on Zoho Books' website |
 FreshBooks NerdWallet Rating Learn more on FreshBooks' website | $19/month Additional pricing tiers (per month): $33, $60, custom. | 30-day free trial or monthly discount (terms vary). | Learn more on FreshBooks' website |
