Job Costing in QuickBooks Online: A Step-by-Step Guide

How to Perform Job Costing in QuickBooks Online
Job costing in QuickBooks Online is a multi-step process that requires job numbers to be assigned to individual items of expenses and revenues. To get started with job costing in QuickBooks you must adjust your settings to track expenses by customer, update the settings on your customer list, products, and services, and then submit estimates and invoices to your customers.
Job costing is a business accounting term that means the tracking of costs and revenues by “job” and the standardized reporting of profitability by job. It is a tool for tracking the specific costs of labor, materials, and overhead related to individual jobs and using that information to see if costs can be reduced in future jobs.
Given its importance, it’s good to know how to perform job costing in QuickBooks Online (QBO). QuickBooks Online allows you to do job costing for 1099 contractor costs and other expenses. Note, there’s still no integrated payroll option that does labor costing. Let’s go step-by-step to see how you can perform job costing in Quickbooks Online.
Job Costing in QuickBooks: Step-By-Step Guide
Before you can start tracking costs, you’ll need a QuickBooks Online Plus subscription, because Budgets are not available in the Simple Start or Essentials levels. When you’re ready to begin job costing, the first thing you need to do is track expenses by customer.
Step 1: Track Expenses by Customer
To track expenses by customer, you’ll first need to adjust your expense tracking preferences in the Company Settings. Click the “Company Name” and/or Gear Icon in the top right hand corner of your QuickBooks Online Screen, then click “Company Settings.”

In the “Sales” tab, click on the Sales form content in the menu, and check the box next to “Custom transaction numbers.” We’ll need this for progress invoicing and receiving partial purchase orders:

The next thing we need to do is tell QuickBooks Online that we want to track expenses by customer (and if necessary, tell it that we want to make expenses and items billable). To do this, click the “Expenses” tab in the Settings screen, then click “Bills and expenses” to edit. You’ll want to check “Show Items table on expense and purchase forms,” “Track expenses by customer,” and “Make expenses and items billable:”

Don’t forget to hit the “Save” button as you make your changes.
The Markup and option to track billable expenses and items as income are determined by your industry and the specific processes your business has in place.
The last bit of setup we need to do is regarding estimates. Click on the “Advanced” tab in the Settings screen, then click “Automation” from the menu. Here, you want to make sure you check the box next to “Copy estimates to invoices” (and you can choose whether to allow pending and accepted estimates, or just accepted). Click the “Save” button, then “Done” in the bottom of the settings screen.

Step 2: Update Setting On Your Customer List
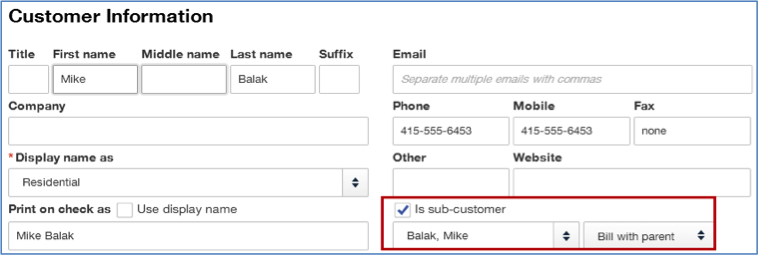
The next step is to adjust the settings on your customer list. We’ll be using sub-customers (these are called Jobs in the desktop editions of QuickBooks), and choosing the “Bill with Parent” option in the customer preferences:
Your customer list, once it’s set up, will look something like this:

Step 3: Adjust Settings on Products & Services
To use Products and Services (what is called the Item List in QuickBooks Desktop editions) for job costing, you’ll need to tell QBO that you purchase each one from a vendor. Not everything on this list needs to be set up this way—just those that you pay a contractor to do or any products that you purchase to sell. To access this list, you’ll want to click the “Company Name”/Gear Icon, then choose “Products and Services” from the List menu:

The following is an example for contracted labor:

This second one shows a “non-inventory” part that is purchased and either sold to customers or used in a job:

The setup is very similar for both—it’s just the details like name, description, sales price, purchase cost, and the accounts that differ. If this was an inventory item, we would have checked the box next to “I track quantity on hand for this product.”
Step 4: Submit Estimates and Invoices
Generally, the workflow is to create an Estimate, have your customer approve it, then convert the Estimate to an Invoice. To create an Estimate, the easiest way is to use the “Quick Create” button, the QuickBooks term for the plus sign that is visible on any QuickBooks Online screen.

Enter the information into the “Estimate” form, then “Save” and send to your customer.

Once the customer approves the Estimate, you’ll be able to convert to an invoice. One thing we recommend doing is getting the signed estimate approval and any engagement agreement signed, scanned and attached to the estimate via the “attach documents” feature.
With QuickBooks, we run into a slight issue in that we cannot progress invoices by default from an Estimate. It’s an all or nothing option built into the product when creating the invoice. We do have a QuickBooks Online tip to work around for this, and it’s the reason we turned on “Custom transaction numbers” in Company Settings.
In the above example, you would change the Estimate #1002 to #1002.01 to indicate that it was the first of the estimates used for the project (alternatively, you could just add another Estimate #1002, duplicating the reference numbers, and use the internal memo field to indicate 1, 2, 3, etc).
Add the description of the total project in the description of the Estimate so the customer can see the details. Now, duplicate the estimate by clicking the “Copy” button at the bottom of the screen.
Edit the line items of the new Estimate to show the remainder of the project, with the details in the description area of a line that has no item in it, just as you did in the original one. Now number this one 1002.02. Should you need more than two invoices, keep repeating the process and numbering accordingly. (Keep in mind, you’ll need to adjust the next new Estimate to the next actual number in the sequence—in this case, it would be 1003, but QBO will default to 1002.03).
You can see below how these two duplicate estimates will look on the Transactions/Sales page:

We’ll add the first half of the job to an invoice—from the Transactions/Sales page you can simply click the “Start Invoice” tab in the Action column, as seen in the above screen shot. We’ll add a description to the invoice that this is the initial 50% down to begin the project:

You’ll do the same with future progress invoices. We’re not going to show that here, but we’ve done it in our QuickBooks Online account so that we’ll be able to see reports that show a completed project.
You’ll also want to make sure you assign the customer to any expenses you purchase. To make this easy to view, we’ve added materials and labor on one vendor bill:

Now that the job is completed, we’ll take a look at the Profit & Loss (P&L) for it. There are two ways to do this:
One is via a standard P&L—you open up the P&L report (Reports tab > Recommended Reports > Profit & Loss) and click “Customize.” In the Customize screen, click “Rows/Columns” on the left, and change the columns from “Total Only” to “Customers.” Now click “Lists” on the left of the screen, and filter by choosing the sub-customer you want to see. When you’re done, click the “Run Report” button.

This is the report you’ll see:

The second way to view this information is to start with a QuickBooks Income Statement called Income by Customer Summary report (Reports tab > All Reports > Review Sales > Income by Customer Summary):

This summary report looks like this:

To view job detail, just click on the sub customer to drill down for a more detailed P&L:

Job Costing in QuickBooks: Estimates vs. Actuals Report
Let’s say you want to compare what you estimated your costs and revenue to be for a specific job to the actual amounts. At this point in time, QuickBooks Online still does not have a default report to show this information. Again, there are two methods to get it. The first is to use a simple Excel spreadsheet. Format your tab in the manner in which you’ll want to view the data and enter your estimated amounts. Add appropriate columns for actuals and differences, entering the formulas for the difference rows, but leave actuals blank.
Once you start accruing income and expenses, you can run reports in QuickBooks Online—either starting with the P&L or the Income by Customer Summary—and save in Excel. Rename the file with the default name QuickBooks Online assigns when it is downloaded (ie: KildalServicesEst2112Actuals.xlsx).
Open both the Excel file that has your estimated amounts, and link to the new spreadsheet. If you’ve never linked spreadsheets this can be done by entering the “=” sign in the cells where you want actual totals, then clicking the appropriate cell in the downloaded report file (you have to have both files open at the same time to do this).
Now you can run that report in QuickBooks Online and save as the job progresses. Just remember to save it in the same place and rename it to the same name each time, or your link(s) won’t work. For more information on linking spreadsheets, click here.
The second (and perhaps easier) option is to use Budgets within QuickBooks Online. Because QuickBooks Online allows for more than one budget per fiscal year (something the Desktop edition doesn’t do), each customer and/or sub-customer in QuickBooks Online can have a separate budget—or even more than one. We use the QuickBooks Online budget feature to enter the estimated costs and revenue.
To do this, from the Company Name/Gear Icon, choose “Budgeting:”

In the window that opens, click the “Next” button. Now choose to start from scratch:

The next choice is to subdivide your budget by customer:

The third screen will ask to what fiscal year you would like to assign this budget, and it will also ask you to name it. We like to enter the Customer:subcustomer with the original estimate number, but you can use whatever naming system works best for your business. Once you’re done with that, click the “Finish” button.

QuickBooks Online will now direct you to the budget screen, where you will enter your estimate amounts. Make sure that you select the correct sub-customer from the drop-down menu.

To enter your estimated amounts, select the lines, one at a time, that correspond to the income and expense products or services related to the job. After you enter the information for one line, click “Save & Next” to get to the next line. When you’ve entered all of the amounts, click the “Finish” button. (You’ll want to make sure you’re entering them into the correct date range as well—do you want to see an annual estimate, or will you be looking at this report by month or quarter? Double check that before you hit “Finish”).

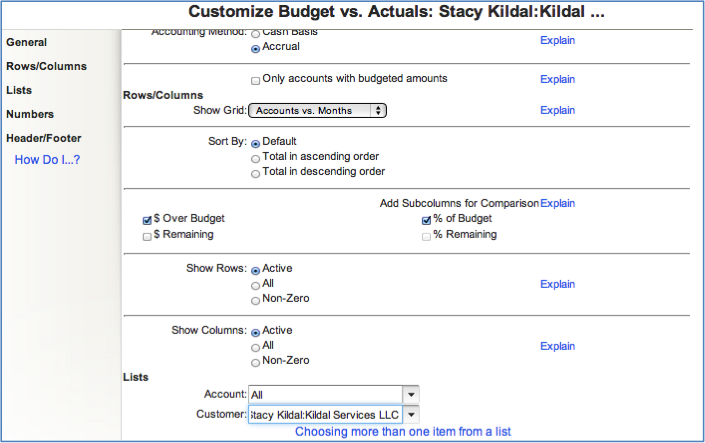
To review your estimates vs. actuals, we need to customize the Budget vs. Actuals report (Reports > Recommended > Budgets vs. Actuals). Open the report and click the “Customize” button. In the Customize screen, click “Lists” on the left side and change “Customers” from “All” to the specific sub-customer you want to review. Once you’ve finished, click the “Run Report” button. (We also suggest memorizing this so you don’t have to customize for that job every time.)
When you run this report in the QuickBooks Online Test Drive account, even with the report basis set to accrual, the actuals only show up if the customer invoices and vendor bills associated with the sub-customer are paid. However, for this example, we got exactly what we were looking for:

You can use this method for labor costs if they’re incurred via a vendor. If you’re using QuickBooks Online Payroll, we suggest using Cathy Iconis’ Job Costing Template, available here.
One quick note: To receive a partial purchase order, you’ll need to implement the same process for Purchase Orders as you do for Estimates—duplicate, edit, renumber, etc.
Job Costing in QuickBooks: Putting It All Together
As you can see, job costing in QuickBooks is a fairly involved process. However, as the old adage goes, practice makes perfect. Continue your Quickbooks training and once you get the hang of it, job costing in QuickBooks will come naturally.
One more resource we want to share is the video that shows this that the QBShow.com co-host, Woody Adams, created. Happy job costing in QuickBooks Online!

Stacy Kildal
Stacy Kildal is a contributing writer for Fundera.
Stacy Kildal is owner/operator of Kildal Services LLC—an accounting and technology consulting company that specializes in all things QuickBooks. From 2012 to 2017, Stacy has been named one of CPA Practice Advisor’s Most Powerful Women In Accounting.
Stacy is one of the three hosts for the QB Show and has also been featured frequently on Intuit’s Accountant Blog, Community “Ask the Expert” forums, at various Intuit Academy To Go podcasts, as well as hosting a number of Intuit Small Business Online Town Hall sessions.
She is a big fan of working mobile and has been recognized by Intuit as being an expert on QuickBooks Online, having written Intuit’s original courses for the U.S., Singapore and Canadian versions.
Featured
QuickBooks Online
Smarter features made for your business. Buy today and save 50% off for the first 3 months.
- The 7 Best QuickBook Apps to Supercharge Your Accounting
- The 15 Best Accounting Books for New Small Business Owners
- 15 Essential Accounting Tasks for Business Owners—and When to Get Them Done
- How to Find a QuickBooks ProAdvisor: A Step-by-Step Guide
- Top 11 Small Business Accounting Tips to Save You Time and Money