How to Reconcile in QuickBooks Online: Step-by-Step Instructions

How to Reconcile in QuickBooks Online: Step-by-Step Instructions
- Click on the Gear button, then on “Tools” and then “Reconcile.”
- Click on the drop-down menu under “Accounts” and select the account you want to reconcile.
- Enter the “Ending balance” and “Ending date” based on your bank statement information.
- Match transactions to your bank statement and check them off one by one.
- Apply filters so transactions are easier to find.
- Keep going until the “Difference” field is zero and you see the Success! page.
What Is Bank Reconciliation in QuickBooks Online?
Like in QuickBooks Desktop, bank reconciliation for your business accounting in QuickBooks Online is a separate event. It is its own module, exclusive from the chart of accounts, check register, and bank feed tools. Just because you have entered transactions into QBO using forms, the bank feed, or some third-party data fetching app, you still need to reconcile your bank accounts in QuickBooks.
Typically, you’ll be reconciling your checking, savings, and credit card accounts. Some might reconcile other current asset accounts and other liability accounts, even equity, but this article will focus on how to reconcile bank statements in QuickBooks Online.
Why and When Should You Reconcile in QuickBooks Online?
You should reconcile your bank accounts monthly, ideally around the same time you get your bank statement alert that it is available.
Why is that?
So QuickBooks Online matches what your bank or credit card institution says you have, says you spent, and says you earned. The ending balance of the prior month should match the beginning balance of the next month (even if just for a few seconds!). And your QuickBooks Online register balance at the end of the last month should certainly match the same on your bank statement.
Your accountant will likely be the one who actually does your bank reconciliations in QuickBooks Online. If the chart of accounts is a backbone of accounting and if the bank feed is a backbone tool of QuickBooks Online, then bank reconciliation is the monthly culmination of life inside of your financial data. Reports are important no doubt, but bank reconciliation is crucial to a healthier business existence. If your bank reconciliation is current and the balances all match, the file itself is 98% healthy.
Finally, this essential accounting task might be the very best barometer of how much time it is going to take your accountant to clean up your QBO file.
How to Reconcile a Bank Statement in QuickBooks Online
Let’s walk through a step-by-step example of how to reconcile in QuickBooks Online.
Step 1: Navigate to the Reconcile Page
There are two ways to access the Reconcile module/page. You can click on “Accounting” in the side panel on the left, and then click on “Reconcile,” or, from the gear menu (A QuickBooks term referring to the gear icon), you can click on “Tools” and then “Reconcile.” Either option, will take you to the same place. See the first screenshot below.
Step 2: Select an Account to Reconcile
Once you’re on the Reconcile page, select the account that you want to reconcile from the drop-down menu. As you can see in the screenshot, we’ve selected a checking account to reconcile.
Normally you would click “Reconcile”—or “Resume reconciling” if you have already started the reconciliation—but notice that we’re getting an alert that our account isn’t ready to reconcile due to an issue. There’s also the option to fix this issue under “We can help you fix it.”
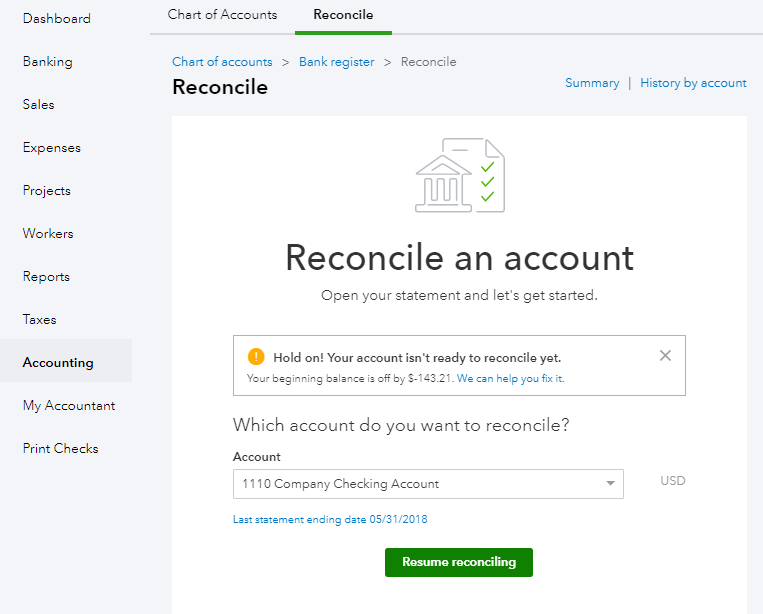
In this case, we have likely either deleted or modified a previously reconciled transaction, so before we can reconcile the next month, we need to resolve it.
Here are a few common mistakes that can mess up reconciliation in QuickBooks Online (and result in you getting a similar alert): changing the date of a transaction, deleting or voiding a previously reconciled transaction (like a check or a bill), or changing the source account of a previously reconciled transaction. These are all things you will want to refrain from doing.
If you think you need to delete something, you should always check with your business accountant first. Deleting something can cause discrepancies between the ending balance from your last reconciliation or it can un-reconcile a transaction that was already reconciled. Obviously, you wouldn’t want to do either of these.
Let’s get back to our case example. How do we fix our issue so we can start to reconcile in QuickBooks Online? We click on the blue “We can help you fix it” link to see what went awry.
The screenshot below is of the Reconciliation Discrepancy Report. This is where you’ll land when you click the fix-it option. In the example, the issue was caused by someone force reconciling an expense by entering an “R” in the checkmark column of the register. This is something you should never do as it does not actually reconcile the transaction—it simply causes a discrepancy.

Fortunately, we can change it back to a “C” for cleared while in this window. Note the result of this quick fix in the screenshot below.

Fixed!
Now we’ll navigate back to the Reconcile page. Notice, in the screenshot below, there are two other blue links in the upper right window of Reconcile.

“Summary” is a list of the prior reconciliations and when they were completed. The “History by Account” link shows similar information to the Summary page, but includes changes/auto-adjustments to the prior reconciliations, as well as the ability to print out a reconciliation report.
If you click on “History by Account,” you’ll see the screen below. (The “Undo” option is something only the accountant can do. You will not be able to see it.)

When we click to view the report, the screenshot below is what we see. A QuickBooks Online tip: this report can get very long, so you can check the “Hide additional information” box, in order to only see data up to the statement ending date. This will help you visually so you don’t get confused with transactions dated past the date you are trying to reconcile to.

Step 3: Enter Statement Information
To return to the Reconcile window, click the blue “Reconcile” link at top right corner of the report.
We’re ready to start to reconcile a bank statement in QuickBooks Online, so it’s time for us to enter the statement information.
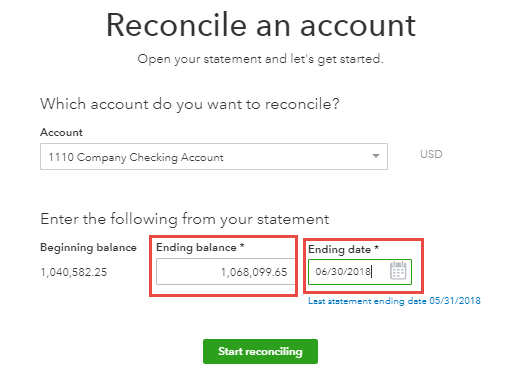
As you can see below, there are three critical fields: the “Beginning balance,” the “Ending balance,” and the “Ending date.”
We want to reconcile a bank statement for the month ending June 30, 2018, so that’s what we’ll enter as the end date. The statement shows an ending balance of 1,068,099.65 as of June 30, so we enter that in, as well. The “beginning balance” field will be auto-populated with the end balance of the previous month (May 2018).
Next we’ll click on “Start reconciling.”
Step 4: Match and Clear Transactions
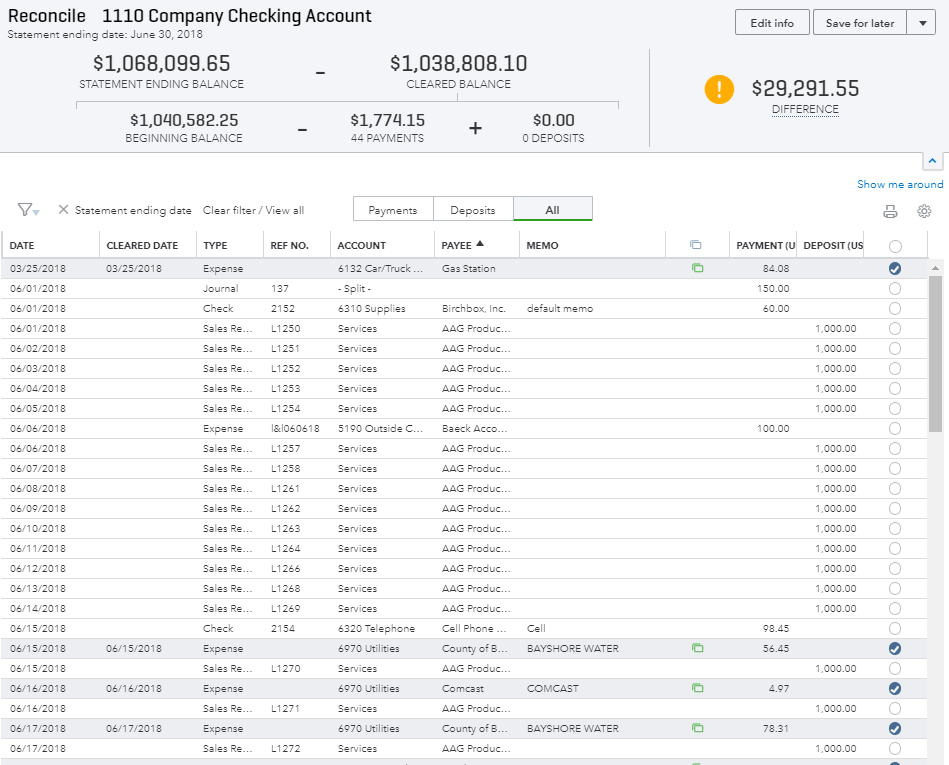
The screenshot below is the page you’ll be taken to next. You’ll need to check this page against the bank statement and check off all of the transactions—payments, deposits, etc.—that show up on the bank statement as cleared.
The more transactions you check off, the lower the difference will be between the statement ending balance and the cleared balance, until finally the difference field will be zero.
Step 5: Apply Filters So Transactions Are Easier to Find
Let’s look at some key ways to filter the above window that will help you locate transactions. The window defaults to all transactions in the register that have yet to be reconciled by the statement ending date.
You can filter the window by Payments or Deposits to streamline the visual. If you click on the filter icon, you can see more options for filtering the data including: Cleared status (the “C” in register column), Transaction type, Payee, and Date.
The Find field can search based on memo, reference number, amount, and greater than/less than.

You can edit any information from your statement by clicking the Edit Info tab.

You can also choose to save the work for later, if you’re still trying to figure out why the “Difference” between “Statement ending balance” and “Cleared balance” is not zero.

Step 6: Continue Clearing Transactions Until the “Difference” Field Is Zero
Ultimately, your goal is the Success! Window below. Once you get to this page, then you can run the Reconciliation report that we looked at earlier by clicking on “View report.” Alternatively, you can click on “Done” if you don’t want to run the report right now.

Final Word on QuickBooks Online Bank Reconciliation
It’s a good idea to get into the habit of reconciling your bank statements in QuickBooks online on a monthly basis. And the best practice is to do it as soon as you receive your bank statement. As you can see, bank reconciliation is an essential skill in learning how to use QuickBooks Online. However, it is a straightforward, step-by-step process, so get to it!

Stacy Kildal
Stacy Kildal is a contributing writer for Fundera.
Stacy Kildal is owner/operator of Kildal Services LLC—an accounting and technology consulting company that specializes in all things QuickBooks. From 2012 to 2017, Stacy has been named one of CPA Practice Advisor’s Most Powerful Women In Accounting.
Stacy is one of the three hosts for the QB Show and has also been featured frequently on Intuit’s Accountant Blog, Community “Ask the Expert” forums, at various Intuit Academy To Go podcasts, as well as hosting a number of Intuit Small Business Online Town Hall sessions.
She is a big fan of working mobile and has been recognized by Intuit as being an expert on QuickBooks Online, having written Intuit’s original courses for the U.S., Singapore and Canadian versions.
Featured
QuickBooks Online
Smarter features made for your business. Buy today and save 50% off for the first 3 months.